One of the most burning questions in today’s situation is how to run an e-commerce business online, and how to help a Shopify Developer run a compatible channel. E-commerce is often used to denote the sale of physical products online, but it can also be described as any kind of commercial transaction facilitated via the Internet. While e-business refers to all aspects of running an online business, e-commerce only refers to transactions in goods and services. Traders and consumers say that buying a rug from an online retailer leads to online sales. Dropshipping allows you to avoid any contact with the goods sold, as you are solely responsible for your e-commerce marketing tactics.
You can take help from the Shopify platform to target people who go online. There is no need to open a brick-and-mortar shop (roadside business), as you never need a security guard. An e-commerce store allows you to attract people like you who may have a strange work schedule or do not have the time to shop in person.
Automate your business by hiring Shopify Developer
If you want to automate your business and you have Shopify Experts, you can set up a website with the help of the best and professional web design services where small businesses can create their ads using templates. Now what I wanted to talk about is the design and layout of the homepage, which can really help make your online business a success. Even if it doesn’t fit your business’s positioning and profit margin, or if you’re not in an e-commerce business, it can still offer other things. An e-commerce expert or Shopify Developer provides guidance that will help you make essential design decisions to create a great e-commerce UX that is professional, attractive, and user-friendly which keeps visitors coming back.
First, an entrepreneur should decide what services they will offer and try to think about how you can develop an e-commerce strategy that rewards your existing customers and makes them come back. Once you have implemented your e-commerce strategy in your business, consider what you can offer your customers regularly. A professional Shopify Development Company has all plans and strategies. Do consult once.
Once you know how to improve your customer’s lives, this is the best way to start your online store. Identify the problems your product solves and if you can sell your personal products on your e-commerce site, which can make a visible difference in the lives of your customers, then you have a head start.
With drop shipping e-commerce, you can add new products to your business without worrying about shipping products or keeping an inventory, allowing you to grow quickly. Work with a trusted supplier who delivers items directly from the warehouse or sells through your own eCommerce website or social media.
Fringe advantages of Ecommerce website
Another advantage of e-commerce is the ability to capitalize on impulse purchases, as online shoppers are more inclined to participate. Customers have individual needs when it comes to payment methods and can cancel potential sales if they cannot pay as they wish on your e-commerce site. By informing themselves about sales and promotions and asking questions during the shopping experience, some customers may prefer online shopping because it is a little less invasive and makes it more convenient for them.
An eCommerce Expert create a website is a fairly straightforward and fast process, and you can develop an online site in just a few hours or even days with the help of an expert Shopify Developer.
You can start your online business this way, and the platform is simple and cheap to use, whether you use it yourself or hire an e-commerce Shopify Development Company. Another advantage of the website builder is that it provides you with tools to guide you in scaling your website and saving it. If your e-commerce site doesn’t respond to mobile web apps, you’re missing a great opportunity.
If you have had an online store for some time or are just beginning your e-commerce adventure, you will succeed if you can attract customers to your e-business. Partnering with a Shopify Developer who understands your business, market, and customers is essential to the success of your website. Note the importance of the FAQ page when you are developing your own e-commerce site so that it can make your site more relevant to customers and their needs. FAQ pages increase sales, but the first step is that which one must not be glossed over.
Add great product photos and product descriptions to influence customer selection, and when buyers successfully find the product they want, they should find it. In an e-commerce store, you can target people who put products in your cart but don’t buy them, those who never buy them, and those who visit your blog posts. That’s why it is much essential to take a guide from the best Shopify Development Services Provider.
Each option has its own advantages and disadvantages, and while there is no single – size – fit that work perfectly for everyone, we believe that any company that is really serious about e-commerce should have its own website. We have collected the best tips and tricks for building web flow to show you that it is the right platform for your company’s websites, regardless of what products you offer. If you run a travel e-commerce company, we send you a list of our top 10 best travel website creation options each month.
Technology to develop ecommerce websites
We employ a diverse range of cutting-edge technologies to develop ecommerce websites, ensuring a comprehensive and adaptable approach to meet your specific business requirements.
An article writing is a type of writing that is written to attain a huge target audience with the assist of the press. In the case of article writing, the press refers to publishing homes of newspapers, magazines, journals, etc. Writing a newspaper article, or writing a journal article is now not easy.
OR
An article is a written work published in a print/electronic medium. It may additionally be for the motive of handing over news, getting to know results, tutorial analysis, or debate. Usually, an article is a piece of writing that is posted in a newspaper or Magazine for guiding a massive target market on a specific subject or subject.
The Art of Writing an Article
An article is a piece of writing which explicates ideas, thoughts, facts, pointers and/or suggestions based totally on a unique topic. There are one of a kind sorts of articles, namely:
Expository article: The most frequent kind of article which approves the author to put out statistics on any unique subject matter except the impact of their opinions.
Argumentative article: An article in which a writer poses a trouble or an issue, renders an answer to the proposed hassle and offers arguments to justify why their suggestions/solutions are good.
Narrative article: An article in which the creator has to narrate ordinarily in the shape of a story.
Descriptive article: An article written with the intention of offering a vivid description that would enable the readers to visualize something is being described. Using the proper adjectives/adjective phrases is what will assist you write a descriptive article.
Persuasive article: An article aimed at persuading or convincing the readers to receive a thinking or a factor of view.
Writing an article takes a lot of effort on the aspect of the writer. Content writers/creators, bloggers, freelance writers and copywriters are humans who have mastered the artwork of article writing, besides which they would now not be capable to make their mark as a creator of any kind.
Five Things You Need to Know about Writing Articles
If you enjoy writing then there are a lot of advantages in it. There are lot of people around who write every single day; I know that. It has however, become so easy for anyone to write and publish their story. With so many benefits and advantages, people say the writing is just a part of the job.
There are a lot of sources on how to write an article, but if you really want to impress your readers, try writing on your own piece. Here are five things you should know about writing.
1. Work, work, work!
Get started writing and put aside a chunk of your free time. You have to find the time to write about today’s information and tomorrow’s and today’s thinking. Don’t wait for the perfect moment to get started on a project. It won’t come.
2. Choose the right topic.
The topic should be on something that is going to inspire your readers’ long-term thinking. Does your topic make sense? You don’t need to be 100% sure. But you should know what type of subjects your article will describe. It doesn’t mean you need to delve into something obscure. Your article is meant to give readers something they can’t find from their archives or the media articles available.
3. Be realistic.
Write an article about your experiences. Be true to yourself. These are two of the most important points to remember. Be yourself. Write the kind of content that you enjoy writing. I believe in writing about experiences I have been through.
You can make mistakes. Learn from them. Make the commitment to learn from them. You can get things wrong. Failing is just part of the process of learning.
4. Conduct in-depth research.
The more you research, the more confident you will be. This may seem like a cliché. It’s true. Just the number of times you find yourself Googling things and searching around the web makes you more confident and confident.
Find examples. It’s easier said than done. There will be articles that you will like but you won’t get to read them. Here’s a great example that shows why you need to check the publications of what is getting high response and check all the issues of the writer to get the best quality articles. Source can add a dash of intelligence to your article. You will always find that the writer you have chosen to make the article will contribute something significant. And you can use that source for examples.
5. Link yourself to a good blog.
This may mean writing an article on Medium or a Blogger. These two have so many benefits to writers. Writing Medium/Blogger blog is particularly advantageous for people who are new to blogging. It allows you to gain readers to your blog as well. Also it’s not difficult to start your Medium blog, you don’t need a lot of special skills.
In order to be in a position to write an article that makes experience in the first place, you have to hold a few matters in mind.
The first and essential aspect that you have to take care of when you are sitting down to write your article is to test if you are properly conscious of the theme you are going to write on.
The 2d element that you have to ask your self is why you are writing the article.
The subsequent factor that you have to center of attention on is the sort of target audience you are writing the article for due to the fact except you recognize your audience, you will no longer be in a position to write it in a way that makes them prefer to examine it.
The language you use is very essential because, besides the proper spelling, right grammar, punctuation and good sentence structure, the article would now not be capable to promote itself.
Use key phrases so that you get a right wide variety of analyzing audiences.
Maintain coherence inside and between paragraphs.
Double-check the records and facts you provide, irrespective of the kind of article.
Keep the title and description as brief and catchy as possible.
Edit and proofread earlier than it is published.
article writing
FAQs on Article Writing
Can I write a appropriate article?
If you recognize all the records about the theme you are going to write about, a excellent hand over the language, a knack to preserve it easy and fascinating throughout, you can write a excellent article.
What is the layout of an article?
The article must have a title/heading and a description that states what the article is about. The physique of the article can be break up into three to 5 paragraphs in accordance to the quantity of content material with appreciate to the theme you are discussing. You can have subheadings and use bullet factors at any place possible. Make certain your introduction makes humans favor to examine the total article and your conclusion leaves them satisfied.
How many paragraphs need to there be in an article?
An article ought to have a minimal of three to four paragraphs. The creator is, however, given the preference to existing the content material in greater than 4 paragraphs, if it would be higher for the article.
A final thought: remember, you need to concentrate on your writing, then, you can give it your all.
Affordable SEO Agency to Bring Results in Your Business
If you are looking for SEO Services, you will find many options. One can be expensive, or others may offer you cheap SEO packages. Alternatively, you can go with some of the affordable SEO Company. All of these have some bright and darker sides and bring changes to your Business.
You may think about the high-cost SEO packages, which may bring a huge volume to your business. Yes, it is somewhere correct, but sometimes they do not work for small businesses or startups. Else, if you have plans to go with cheap SEO services, it may not give you the results that you want, and it will completely be waste of time and money.
Just imagine the huge difference in price from an expensive SEO Service provider who offers SEO Services for $500 to a cheap SEO service company for just $50. How can they both be the same? Here, we will discuss how to choose the best SEO Company in Delhi, India, which can bring positive results.
What does “Cheap SEO Services” mean? It means something, which is poor quality, less worthy, not the value of money and all. Are you ready to put the future of your business into the hands of such companies? We will not advise you to go with such companies who offer you a cheap SEO service in Delhi, India, or anywhere. SEO involves many methods to follow. Website audit to backlink creation, making it internet perfect to beat the competition and make it top search engines. How can all of this involve 50 or 100 bucks?
We have mentioned some of the points, which will ring a bell for, not to go with the company:
Any SEO agency offering your services between $50-$200 per month.
A website without complete contact information, like phone number, email id, and physical address.
They don’t offer you a single point of contact for all your queries
Not good content or unorganized website.
Not good content or unorganized website.
Do not offer you a custom SEO Package as your requirement, and just stick to their pre-made SEO package.
No pre-work is getting done to understand your business and ways of working.
Poor customer rating, no customer rating or pre-work mentioned on the website.
Companies based in third world countries or counties which are notaries for cyber scamming
Any of the above activities can be an alarming bell for you to get alert.
Do You Need an Expansive SEO Company?
It is easy to search for a company that offers the best SEO services. However, that does not mean it should be expansive as well. Some companies only dream of investing in such services that up to charge $5K per month. Yes, some companies charge this much and promise to promote you to the top. Of course, this may boost your website to the top but really is $5k for a month. It is not at all within reach of many small businesses, startups, entrepreneurs, and even some medium-sized businesses.
The fact, such costly SEO services cannot be suited for all companies. It is only for some of the companies that are earning a lot and can afford to spend some good on SEO. However, is it that only an expansive SEO services company can bring business to you? The answer is NO!! There are many Best SEO Company in Delhi, India who offers you these services at a very reasonable price.
You are not required to spend a five-digit figure to get the best SEO services. An affordable SEO company in Delhi, India can help you to create your brand and bring change to your business. You may need to spend a lot on SEO if you are a big brand, large eCommerce, high growth business, or large publisher to beat a completion. However, for startups or mid-scale of businesses, cheap or expensive SEO, can be wrong.
The midway is the best, which is Affordable SEO services in Delhi, India. Invest as per your business budget, get it customized as needed, and secure a place on top.
To know more about how can SEO help to get business, read the previous blog.
How to Find an Affordable SEO company in Delhi? Are you still confused if a company you have selected is good for SEO Services or not? As the Best SEO Company in Delhi, we have listed some generic questions you can ask an SEO Agency. It will help you to judge if your search ends or not.
Ask questions related to their experience and past work – To begin with, ask if they do local SEO or country-specific SEO. What is the biggest website they have worked on till now based on traffic and website size?
Are they new to SEO Business? – Ask questions like, When a company starts SEO Services? How many SEO projects they have promoted as of now? how many websites currently promoting through SEO Services? What is their current ranking?
Find their ways of working – Find out if their services include social media marketing to target your specific customers, content marketing, and all. Ask what approach they will follow to make you popular, and brand on search engines.
Are you getting a dedicated person to support you with all your concerns? – As stated earlier, if you choose cheap SEO packages, you may hardly get a dedicated person to support you. Sometimes, there is a complete gap between what is going on with your SEO work. But if you are getting someone, make sure to ask about the experience of that person and see some previous work. Ask for a weekly update report on your project.
How much time will it take to make get the first-page ranking – Do not believe the company says that “we will make your top in a month”. SEO is a complex task and needs to be trusted by only selected companies that are known for offering the best SEO services. With most highly competitive keywords, it may take up to a year as well.
Read their customer’s reviews – Check online about their customer’s views. Ask that company for some of the referrals. You will find both, good and bad reviews, and filter out what you basically want to know.
These questions may seem just okay, but their answers can help you to find the best and affordable SEO company in Delhi and anywhere in the world. Thus, you can get the best SEO services at a better price.
Your store needs to be designed with your customers in mind. IOGOOS Solution helping eCommerce industries to boost website and mobile app traffic that makes a purchase, also known as a conversion.
While boosting your traffic can generate more sales, it’s just as important to focus on turning your current traffic into paying customers.
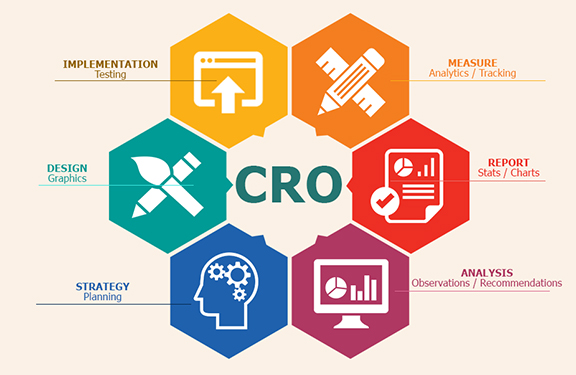
At every step of your customers’ purchasing journeys, there are new opportunities for you to make their paths shorter, easier, and more enjoyable. Through rigorous experimentation and analysis, you can fine-tune your website to push people closer to making a purchase. This process is called Conversion Rate Optimization or CRO.
Conversion Rate Optimization is a technique for increasing the percentage of your website traffic that makes a purchase, also known as a conversion.
Conversions are a big deal. They’re that great moment when a casual visitor to your store finally buys one of your products.
And, on a much smaller scale, conversions are happening all the time leading up to that moment, too.
For instance, a conversion on your homepage might mean having a visitor click through to a product. A conversion on a product page might mean a customer clicking ‘Add to Cart’. Conversions can be entirely dependent on the purpose that a specific part of your website serves.
To optimize your online store for conversions, both big and small, you need to be constantly testing each and every aspect of your website.
Is conversion rate optimization for you?
CRO is a crucial tool for business owners, but it isn’t right for everyone. In order for you to successfully optimize your online store, you first need to have enough traffic to properly conduct a test.
Without the right amount of traffic, your results won’t actually provide any real insight into how your customers are using your online store. To help you determine whether CRO is right for you, let’s take a quick look at its fundamentals.
If you don’t have enough traffic to run an A/B test, focus on getting more visitors to your store instead. Here are some tactics you can use:
The Basics of Search Engine Optimization for Your Online Store
6 Practical and Proven Ways to Drive Traffic to Your New Online Store
How Blogger Outreach Can Help You Grow Your Ecommerce Store
An Introduction to Facebook Ads for Ecommerce
An introduction to A/B testing
One of the foundational elements of CRO is a form of experimentation called A/B testing, also known as split testing.
A/B testing is a way of comparing two versions of the same webpage to see which produces better results. With A/B testing, two different versions of a page are shown to two similar sets of visitors at the same time. Eventually, the version that performs more effectively and produces a larger amount of conversions is declared the winner.
Before you conduct an A/B test, you’ll need to figure out if your website gets enough traffic to generate statistically significant results. If your sample size is too small, you won’t be able to learn anything from your results since they won’t accurately reflect how a larger population is using your site.
If you want to calculate how large of a sample size you’ll need to conduct an A/B test, you just need to drop your current conversion rate for the web page that you’d like to test into this calculator. If the traffic that the web page receives is less than the sample size required for the test, focus on driving more traffic to your website first rather than optimizing for conversions.
Finding the current conversion rate of a single page
To find your current conversion rate, you’ll first need to make sure that you have Google Analytics set up for your online store. With Google Analytics, you’ll be able to figure out the conversion rate for specific parts of your website, including the web pages that you’ll be testing.
Note: This method will just give you a glimpse of your current conversion rate and should not be used for measuring the outcome of your tests. Only use this piece of data for measuring whether or not you have enough traffic to perform a successful A/B test.
The quickest way to find the current conversion rate for specific pages of your website is by using the Landing Pages report in Google Analytics.
To get to Landing Pages, first go to the ‘Behavior’ section and then click ‘Site Content’. In the dropdown, click on Landing Pages. Make sure that the timeframe you’re looking at is the same amount of time that your test will be running. For the purpose of this part of the process, just use the past 30 days.
Now, select the web page that you’d like to test from the list of landing pages. For instance, if you’d like to test your home page, click on www.youronlinestorename.com.
In order to find the conversion rate for a specific goal that occurs on this page, you’ll need to add a secondary dimension to your report. Click ‘Add Secondary Dimension’ and type ‘Second Page’. The ‘Second Page’ dimension will tell us which pages visitors navigated to next and which percentage of visitors to your first page went to those pages.
For an example, let’s say that you’re interested in testing how many people navigate to the products page of your website from your homepage.
To find your current conversion rate for this action, simply choose your homepage as your initial page and then look for your products page under the ‘Second Page’ section of your report. The small grey percentage that’s listed in the ‘Sessions’ section will be your conversion rate for the action.
How to create Conversion Rate Optimization experiments
If your site has enough traffic to perform a successful A/B test, you can start experimenting on your online store.
In Google Analytics, goals are a way of measuring how your website guides visitors to completing a specific task or objective. Goals can be anything: From a product purchase to a newsletter subscription to a simple navigation. By setting up goals for your test, you’ll be able to track and analyze the data behind the decisions that customers are making as they move through your site.
There are five different types of goals in Google Analytics: Destination, duration, pages per session, event, and smart goals. For the purpose of CRO, destination goals and event goals are the ones to focus on.
These types of goals are used for tracking when a specific web page loads and track pageviews as conversion. You can use destination goals for tracking things like purchases or navigation.
If you want to track a purchase, simply set the ‘Thank You’ or order confirmation page as the destination and a conversion will be tracked every time a customer completes an order and is redirected to the ‘Thank You’ page.
To track navigation goals—like someone heading to a collection from your homepage—set the destination as your collection page.
Event goals can be used to track actions on your website that do not necessarily lead someone to a landing page.
For instance, if you want to track someone subscribing to your newsletter or adding an item to their cart, you can set the action of a customer clicking a specific button on your website as an event.
20 CRO Experiments to get you started
Optimizing your online store isn’t a one-and-done solution for ecommerce, it’s an ongoing process that will help you constantly learn more about your audience and how you can better serve them. It’s not a tactic with an endpoint—it’s something that you should always be doing to get better.
There’s no set rulebook for optimizing your website either. Tactics that work incredibly well for one store might have no effect on another. That’s why it’s important for you to start experimenting now, so that you can track your results and figure out how they can help you build a more successful store.
Be sure to keep a list handy of all the experiments that you’re planning on running in the future, so that you’re never without a new idea to explore.
To get your list started, here are some suggestions for different things you can potentially test throughout your online store.
Think about your homepage as a physical storefront. It’s the front window of your store: Capturing attention, igniting curiosity, and pulling people in.
Your home page needs to feel inviting and make it easy for people to enter and navigate your store. It needs to be a visually appealing and consistent experience that works towards achieving a single goal: Get people further into your store so that they can find products they want to purchase.
Just take a look at Province of Canada. For their homepage, they’ve used a large hero image that occupies most of the space above the fold. The copy is simple and straight to the point with a clear call-to-action that pushes visitors right to a collection.
2. Show off coupon codes, real time purchases, and more
As soon as your customers hit your homepage, you have the opportunity to start building excitement and driving them towards your products. If your goal is to get more traffic to your products, there are a bunch of great apps for Shopify store owners that can help drum up demand and incentivize purchasing:
Welcome Bars: Apps like Welcome Header Bar and Quick Announcement Bar let you share sales, coupon codes, promotions and more with your customers as soon as they arrive on your site. These apps add a non-intrusive floating bar to the top of your homepage that will instantly grab your customers’ attention and push them exactly to where you need them to be. Promo codes can be powerful tools: Build.com was able to increase conversions by 6% for their affiliate traffic with a custom promo code.
Popups: Popups and popunders are fantastic for building your email list. Try using an app like Privy or POWr Popup to add a quick popup to your home page offering a coupon code in exchange for a newsletter signup. Email marketing is incredibly effective: According to a 2014 study, 80% of consumers who signed up for emails from a brand over a six month period ended up making purchases based on what they’ve received.
Real Time Purchases: Apps like Yo, Recent Sales Notification, and Notify add a small notification to the bottom corner of your store, showcasing real time purchases being made by other customers. These apps incite a sense of urgency while also giving customers social proof that other people are out there buying your products right this minute. Behavioural psychology researchers at the University of Kentucky report that urgent situations cause people to act impulsively and quickly.
For example, take a look at Atelier New Regime. They’ve used the Free Shipping Bar app to show off their free shipping threshold right on their homepage.
After a few seconds, visitors to their online store also get served this gorgeous popunder encouraging them to join the Atelier New Regime mailing list for access to news and exclusive deals.
3. Add Testimonials to Build Trust
Have you been featured on major publications? Are your products used by any high-profile influencers? Add testimonials, reviews, and badges to your homepage beneath your main content to build trust and project credibility. After all, 88% of consumers trust online reviews as much as they trust recommendations from their friends and families.
Once customers are on your homepage, they need to be able to find the products that they’re looking for and discover new products that they might be interested in.
Your customers need to be able to navigate your website through a well-thought-out search function, smart category design, and engaging ways to discover products.
4. Use intelligent search
If your customers are looking for a product on your website, the chances are that they might not know exactly where to find it.
If your store has a large amount of products, you might want to considering featuring your search bar prominently on your homepage, giving your customers the opportunity to head directly where they want to be rather than digging through categories.
With apps like Findify and Instant Search +, you can power up your search bar with predictive results that help your customers find what they’re looking for. Intelligent search bars suggest results and products as users are typing while taking into account things like spelling errors and alternate product names.
Sigler Music uses the Instant Search + app to help their customers find exactly what they’re looking for. Even after entering just a few letters, the search bar already starts suggesting categories, products, and related results.
5. Organize your categories effectively
For your customers, navigating your website should be easy, simple, and—most of all—obvious. Try to avoid separating your products into too many different categories. Instead, opt for 4 to 6 broad categories that contain more specific subcategories as a dropdown.
Order your categories in your navigation bar based on their popularity, with your most popular category at the front.
6. Take advantage of your 404 pages
Are your 404 pages a dead end? Instead of leaving customers hanging when they hit a 404, try to guide them to other parts of their website that might be more useful. Customize your 404 page to feature links to your most popular collections, products, and promotions.
Instagram is an extremely useful tool for product discovery. Embedding a shoppable Instagram feed onto your website is a great opportunity to inspire your fans with gorgeous photos and show off your products in everyday scenarios.
If you own a Shopify store, you can embed your Instagram feed onto your online store using apps like Foursixty, Like2Have.it, Springbot, SocialPhotos, and Showcase, just like the one above created by MVMT. With these embeddable Instagram feeds, you can promote your top products and link out directly to their product pages, giving your fans a visually engaging way to find new products.
Product pages
Each and every one of your product pages needs to built around clearly communicating the value of your products to your customers. You need to build immersive experiences that cover every aspect of your products while removing any opportunity for doubt or frustration.
As a bonus, include a video that shows your product in action. For instance, if you’re selling t-shirts, add a video to your product page with a model walking around while wearing one of your t-shirts to give customers a better idea of what your shirts look like in motion. Customers are actually 85% more likely to make a purchase after watching a product video.
Bando has some great examples of well-executed product pages. Check out this page for a 17-month agenda, featuring a bunch of high quality photos and a fun, quirky video that really lets the product shine.
9. Be upfront about price, delivery time, and out of stock products
The worst thing that you can do is mislead your customers—28% of customers will abandon their cart if they get charged with unexpected shipping costs. Don’t be afraid to let them know the full extent of things like pricing, delivery time, and inventory. If you do an effective job of selling your products and communicating their value, your customers won’t mind paying a little extra for shipping or waiting a little longer for delivery.
If you own a Shopify store, you can also use apps like Restocked Alerts to give your customers the option to be notified when out of stock products are added to your store.
Positive product reviews can make all the difference in convincing shoppers that a product really works and is actually worth purchasing, along with helping them make more informed decisions in regards to sizing, colour, and more.
Shopify store owners can use apps like Product Reviews and Yotpo to embed customer reviews directly onto their product pages.
Product reviews can be especially helpful for business in the beauty and skincare industry. Beardbrand, for instance, uses Yotpo to showcase reviews on every one of their product pages.
Product page Instagram feeds are specially useful for beauty and apparel companies since they can show your customers how to style your products and give them a better idea of how they look and feel in real life.
To embed Instagram feeds on your product pages, try apps like Foursixty and Like2Have.it.
Checkout experience
The checkout experience is one the final steps of every customer’s purchasing process, so it needs to be as frictionless and flawless as possible to avoid having frustrated customers abandon their carts at the last moment.
At this point in their journey, your customers are display clear intent to make a purchase. You need to make that purchase happen quickly and conveniently without any stress or confusion.
In your Shopify admin, head to ‘Settings’ and then ‘Checkout’.
Under ‘Customer Accounts’, select ‘Accounts are optional’. With optional accounts, your customers will still be able to checkout as guests, but it also gives them the chance to save their information for next time after filling out their personal details.
If you want to invite your current customers to make accounts, you can use the Bulk Account Invite Sender app.
13. Send abandoned cart emails
Unfortunately, customers sometimes fill up their carts with products and then leave your store with no intention of returning. With abandoned cart emails, you can remind those customers of the items that they’ve already expressed interest in and give them a little nudge to return to your store to complete the purchase.
Abandoned cart emails can be set up in the ‘Settings’ section of your Shopify admin. Go to ‘Checkout’ and then scroll down to the ‘Order Processing’ section. You can choose to send abandoned cart emails either 6 or 24 hours after a customer abandons a cart.
You can customize your abandoned cart emails in your Shopify admin as well, so that they fit your brand’s image and tone. Go to ‘Settings’ and then ‘Notifications’. Under the ‘Template’ column, you’ll see one for ‘Abandoned checkout’.
14. Optimize your thank you/order confirmation emails
In the same ‘Notifications’ section of your Shopify admin, you can also customize your Order Confirmation emails.
After a customer has placed an order, there’s still an opportunity to put them back into your purchasing funnel by optimizing your Order Confirmation email to encourage them to sign up for your newsletter, link them to content on your blog, or offer them exclusive discounts and promotions for future orders as a token of appreciation.
Shipping and returns
Even after a customer has gone through the checkout process, you need to remember that the purchase isn’t over until the product is in their hands. Think of how you handle shipping and returns as yet another opportunity to delight your customers and turn all of those one-time shoppers into lifelong customers.
Waiting for a package is an anxiety-inducing experience. Receiving a product that you’re dissatisfied with is even worse. You need to do everything in your power to make shipping and returns enjoyable for your audience.
15. Offer free shipping
Expensive shipping costs can be a huge pain point for customers and potentially hold them back from making purchases. Try offering free shipping to encourage your customers to put in an order, regardless of how far it has to travel. Free shipping can have a major impact on conversions: In one case study by SitePoint, offering free shipping increased conversions by 50%.
16. Have a clear refund policy
It’s no surprise that some customers are hesitant about making purchases online. When it comes to ordering things like clothing, it can be difficult to know exactly how a piece will fit in-person. To help relieve your customer’s concerns, make sure that your business has a clear refund policy so that they know exactly what they can do if they aren’t satisfied with an order.
Although optimizing elements like your homepage, product discovery features, and product pages is crucial for pushing your customers through the conversion funnel, you also need to make sure that your website contains additional information like contact details and an about section.
17. Tell a story with your about page
Your About Page is so much more than a brief summary of your store. It should tell a story to your customers about your products and your brand’s mission. The goal of your About Page should be to build a lifestyle around your products that your audience will want to be a part of.
Try to build a story around both your products and your customers’ relationship with them. Ask yourself questions like: Where did your idea come from? What makes them special? What does an average day in your ideal customer’s life look like?
Endy has a comprehensive About page that sells their mattresses from a number of different angles. At the top, you’ll find a great hero image, a concise summary of their products and what sets them apart, and a link to some customer reviews.
As you scroll down, you’ll see details about their shipping and return policy as well as a charming story about the origin of their name.
18. Create a comprehensive contact page
If your customers want to get in touch with you, they should be able to do so easily. In fact, 44% of visitors will leave a website if there isn’t contact information or a phone number available.
For customers, not being able to share their thoughts and feelings—whether positive or negative—is an extremely frustrating experience. Your contact page should include ways for your customers to reach out when something goes wrong as well as opportunities for them to engage with your brand in fun and exciting ways.
Here’s a quick checklist of everything that your contact page should include:
An email address or contact form
Your physical location, along with a map and directions
Your retail store hours
Links to your social media profiles
Support-specific contact options, including a phone number or email
Website speed and performance
The performance of your website is closely tied to your success as a business. In fact, if a website takes longer than 3 seconds to load, 40% of visitors will automatically leave. That’s a huge amount of traffic that you could be turning away without even realizing.
Imagine you were waiting outside a store and you had to wait for the owner to come to the door to let you in. Sure, you might wait one or two seconds for them to come to the door. But fifteen? Thirty? Try counting those seconds out loud and you’ll soon realize what you could be putting your customers through.
19. Make sure your site is mobile responsive
Being mobile responsive should be a massive priority for your business. In fact, 40% of people will choose another result if the one that they land on is not mobile-friendly. Thankfully, if you own a Shopify store, every Shopify theme is automatically optimized to be displayed properly on every device.
The easiest way to check how long your online store takes to load is by using Google’s Pagespeed Insights tool. Pagespeed Insights will give you a detailed report of how fast your website loads, along with any issues that you can resolve to improve your load times. Alternatively, you can also use load time evaluation tools like WebPageTest and Pingdom.
While optimizing your store’s load times can be a complicated process, there are a couple things to always keep in mind. The size of your images can have a significant impact on how quickly your website loads. Try to compress and optimize every image using a tool like ImageOptim. ImageOptim strips away all of the unnecessary data in every image file, resulting in a much smaller file size with no noticeable visual difference.
Additionally, for Shopify store owners, try uninstalling any apps that you’re no longer using as these apps can still put an additional load on your website even if they’re disabled.
Start your first experiment
Now that you have some ideas, it’s time to start optimizing! Get out there, run experiments, and discover exciting new ways to increase your conversions.
Remember: Always be testing.
Have any more questions about Conversion Rate Optimization? Let us know in the comments below.
You already have it clear. You want to sell your products online. Today we are going to show you the advantages of creating an online store with one of the platforms that are making the most “noise”: Shopify eCommerce Development Services. And we are going to compare it with Laravel web development. From the basic to the most advanced: we will try to decode the comparison. And also guide you to choose the best Shopify Development Company and Laravel Development Company.
What is Shopify’s development?
Shopify is a platform with which to develop an online store and has proliferated since 2006. The speed with which it has penetrated the market is mainly due to the ease it gives the user to have their store ready quickly. The platform includes hosting, and you must buy a subscription directly with them, which means that you cannot install your store on any other server.
It is of no doubt that Shopify is the best platform to create and design algorithm friendly and responsive online store. However, instead of using existing design and templates, it is better to consult with a professional Shopify Development Company. If you are looking for such a professional Shopify web development company at an affordable price, contact IOGOOS solutions. It is one of the best and leading e-commerce development companies. It has professional experience, an expert team of designers and developers, and extended support.
What is Laravel Development?
Laravel is a PHP web framework for the development of web applications or e-commerce apps. It is an open-source and free web framework. For those people, who want to have maximum control and personalization of their web application, Laravel is one of the best alternatives. Taylor Otwell creates it. It follows the MVC pattern to develop web applications. As dictated by its slogan, Laravel is the PHP framework for artisans. If you need customization, Laravel development is ideal.
It would help if you remembered that Laravel development is not as flexible as Shopify Development Services. How and why, we will try to reveal them soon as we progress to the next step: Shopify or Laravel – which is better?
Shopify vs. Laravel – which is better?
Shopify wants to stand out for its ease of use and “create” your store with functions such as “drag and drop.” Besides, Shopify offers you a predetermined template from the beginning of the registration. It is better to choose Shopify web Development Services as it provides hundreds of in-built features. Now selling products directly from your website is possible.
With Laravel, you will need a little more training. But it allows you to personalize your eCommerce fully. If you want the ease of use, Shopify certainly has one more point in its favor than Laravel. If you are looking for customization, then it is Laravel development. Consult with the Shopify experts online, now.
Which is more functional – Laravel or Shopify?
When choosing a platform on which to develop an online store, it is essential to consider the functionality and scalability of the tool, since eCommerce involves the use of multiple payment methods, shipping options, offer management, etc. If you want to gain functionality with Shopify, you have to increase the plans contracted with the company. The basic Shopify plan includes a list of unlimited products and has up to two users. But it does not include processing payments through the platform.
With Laravel, you have access to all the functionalities from the beginning without any extra cost. The only thing that makes Laravel development vulnerable in the competition is that you need to hire a hosting company separately to host the website. Guess what, Shopify already includes it. You are free to sell services/products online across multiple social media sites and marketplaces.
Which one has better performance – Laravel or Shopify?
SEO – A website that does not flow, that does not load fast is a waste of money, why? Because no user will wait to see how your website stacks. You must understand the SEO factors that most influence positioning. So, worry about choosing the platform that allows you to offer your future clients an optimal loading speed.
SECURITY – When you have an online store, you should know that you are handling your customers’ information. So, one issue you should worry about is security. If your website is attacked and your customers’ data is leaked, you will be exposed to a lawsuit, but your reputation will also fall.
These are the two primary factors that a web developer must understand. However, there are other factors too. In this case, Shopify gains positive remarks. Shopify is the ideal choice when it comes to SEO and Security. Why? Although Laravel indeed offers a sound security system, Shopify has more security modules or extensions than Laravel development.
If you want to know more about this topic, consult an expert e-commerce web developer from IOGOOS solutions, one of the leading Laravel Company and Shopify Company.
This pandemic has shaken everyone in this entire world whether they are Top, mid, or low business entrepreneurs including the consumer psyche. Making business again the long-term success is too much difficult. At this time, IOGOOS Solution come out with many marketing strategies that boost and enhance revenue with low investment. It is in many forms: If your business is in an infancy stage, website designing services work. If it is an eCommerce business, then Shopify Development Company helps you to expand your store in an online world. In addition to this, if the business is already in peak stage but unable to reach customers, in that case consulting a professional Search Engine Optimisation Agency for getting the best affordable SEO Services works best.
We believe to work in ever-evolving techniques with high financial performance. Living in the 21st Century and working with traditional approaches is no longer enough. To maintain and sustain the dignity of your brand in the market must extend beyond traditional focus so that it works in this dynamic environment. It is best to go for Shopify Development Services for eCommerce acceleration to expand your business to the core.
Creating, enhancing, and maintaining an eCommerce website is not at all easy. Best Shopify Development Company in USA plays a major role in your business success. Hire an expert and professional Shopify Developer that can develop, upload catchy, make it user-friendly, give clear product details like FAQs, navigation tools, contact us, etc. Product range, data size, and online product listing are a few challenges faced by business owners. Being the best Shopify Development Company, IOGOOS Solution believes in and gives assurance to tackle all challenges.
With the high demand for Online Shopping, providing the best customer experience on your business product is a sign of a boost. Shopify Developer in India helps you out in managing eCommerce management with ease. It is fact that your business product is not only the one which is in the market. Customers are more focused on easy navigational sites, with the best offer, pricing, quality, promo codes, vouchers, coupons, etc. Consumers nowadays trust online reviews, ratings, and real product purchased images. These are only the points that can make your business stand out from the crowd.
Professional Shopify Development Agency analyzes and captures the market easily. But it is hard to find an expert Shopify Developer in this competitive world. Always go for Shopify Company which has expertise in all technologies and CMS, which has also core competencies in SEO. Getting Best and Affordable SEO Services in India helps in climbing up in search engines by analyzing demographic and target location. This is a bonus if you approach IOGOOS Services.
Over 15 years of experience in Website Designing Services, IOGOOS Solution is responsible for business growth and new customer approach through updated marketing techniques….
If you’ve been blogging for a while I am pretty sure you are not new to this term. For everyone else, I’ll take a few words to explain what it is and how to get it to save you valuable time and several hours of study and research.
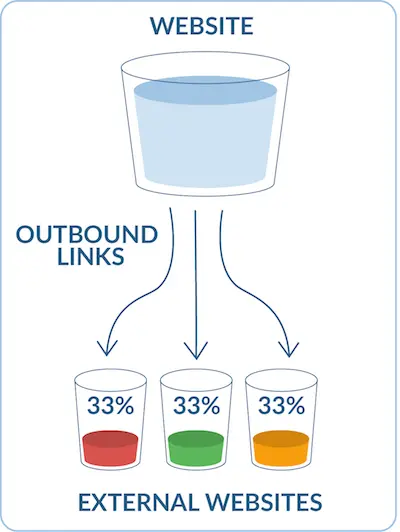
In search engine optimization (SEO) terminology, Google Juice is a term that means the unique visitors coming to your website from search engines (primarily Google, because of its domination in the Search Engine market). This is also known as organic traffic which only stops by if your website is optimized for search engines like Google, Yahoo, MSN, etc.
Importance of Google Juice
The more you get, the better it is for you. As per the research done by forrester.com, 80% of Internet users find websites by searching for keywords on popular search engines like Google, Yahoo, MSN Live, Ask, etc. and it’s really important that your web pages are listed in the results. If for a particular search term, pages from your website are listed on the first page of the search results then you are going to have loads of visitors stopping by your website if they are looking for that search term or related stuff.
Pages from your websites stand a chance of getting some visitors even if they are listed on the second or even third page of the search results. Otherwise, you shouldn’t (actually, you can’t!) expect significant traffic coming in from Search Engines unless the person who’s looking for something is patient enough to dig a couple of pages of search results for some search term.
How well are you ranked in Search Engines?
Technically speaking what makes your web presence known is your search engine ranks. Simply put, how well you are known online is determined by the rank your website enjoys in search engines. Page Rank (PR) by Google is one such important metric assigned to websites listed in Google Search Results which webmasters and advertisers often use to judge the quality of a website. The higher it is (on a scale of 10), the better a website is considered, and the higher it is listed in Google Search Engine Results. Obviously, it enjoys more Google Juice than lower-ranked websites.
Get listed in Google within 30 minutes
All those SEO and Make Money Online websites next door will try to show you ways to scale the first page of Search Engine results once you’re listed but what they won’t tell you is how to get listed in Google search results within 30 minutes!
We’ll consider scaling the front page of search results in a later post in the SEO series but right now concentrate on how to get your web pages listed so soon.
This post is the first part of this series (Get Listed in Google within 30 minutes) and will be focused on websites and blogs built with WordPress as CMS. However, a lot of these tips apply to static websites as well. So, let’s start sharing best practices…
WordPress Plugins and SEO
With the popularity of WordPress and the contributions of the WP community, managing websites and implementing SEO has become a lot easier. There are various WordPress plug-ins that are available for SEO purposes but the 2 plug-ins I would like to recommend to you are:
1. Google XML Sitemaps This plug-in will create a Google sitemap compliant XML-Sitemap of your WordPress blog. It supports all of the WordPress-generated pages as well as custom ones. Every time you edit or create a post, your site map is updated and all major search engines that support the site map protocol, like ASK.com, Google, MSN Search, and YAHOO, are notified about the update.
Once you activate this plug-in go-to plug-in settings and create the sitemap for the first time. You can see the output with this URI: //www.your-domain.com/sitemap.xml. Now we have our sitemap ready so let’s tell Google about it. Type //www.google.com/sitemaps in your browser and log in with your Google ID and Password.
On this website you can submit your sitemap to Google and Google will start indexing your website. This process requires site verification where you need to add a Meta tag or upload an HTML file to your web server. It’s very easy to complete and you can get step-by-step instructions on the Google website.
2. All in One SEO Pack This plug-in optimizes your WordPress website/blog for Search Engines. It automatically optimizes page titles for search engines and generates META tags. This avoids the typical duplicate content found on WordPress blogs. For WordPress 2.7 (the latest version) you don’t even have to look at the options, it works out of the box. You can override any title and set any META description and any META keywords you want while writing the posts or pages. You can fine-tune almost everything related to search engine optimization. To get the most out of it, do a little keyword research for the content and use the best keywords while writing the posts and pages.
Tomorrow, I will further dig into SEO stuff relating to getting listed in Google within 30 minutes of updating your blog/website. The next thing I’ll talk about is services that your WordPress can automatically ping and notify them about updated content. I’ll also tell you how to fine-tune your link structure (permalinks) as they are not very search engine friendly by default. Stay tuned…
“People count up the faults of those who keep them waiting” Seems like I kept them busy decoding this loading bar 😀
Recently, while browsing I landed on a page on StackOverflow.com where people were discussing how I implemented this loading bar on www.iogoos.com I could sense a lot of confusion in the discussion so thought I would take the mystery out as I love to share best practices. Here’s how you can create a loading bar in a few steps…
Things You’ll Need
A nice loading image: If you are good at creating animated GIF images that are nice, otherwise you can create a loading image with this cool Ajax Loading Gif Generator.
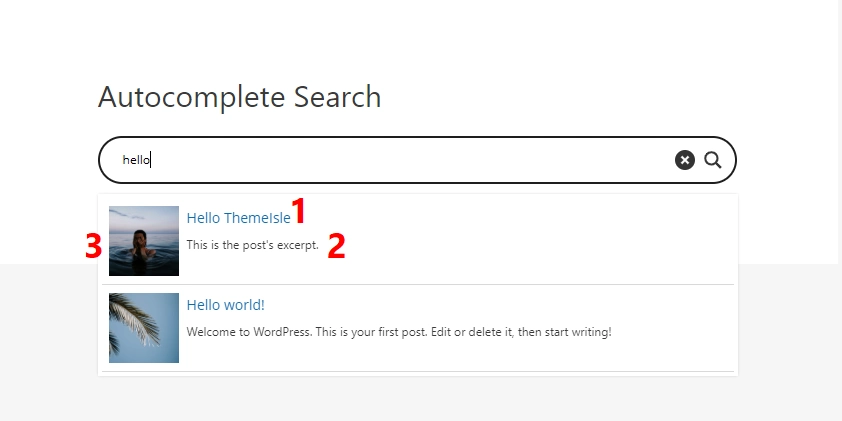
I am pretty sure that you are aware of Google Search Suggest and Yahoo Search Assist features. This feature helps you effortlessly find exactly what you’re looking for. No doubt, it lists a few suggestions to keep the user looking for more and more.
As you type something in the search box, it automatically offers search terms and phrases in real-time. How nice will it be to have the same feature on your website or blog. In this post, I am going to explain an easy way to add a search suggestion feature to your WordPress blog or website.
Things You’ll Need
jQuery: You can download the latest version from jQuery.com Autocomplete Plugin: Download this plug-in by Jörn Zaefferer from //bassistance.de
Here I am assuming you are using “js” folder to keep all your java scripts and supported files. You may need to update the location of these files based on your folder setup.
Here’s the actual jQuery code to enable this feature on an input box:
<script type=text/javascript>
    var data = "Search Terms Separated With Spaces".split(" ");
    $("#myInputBox").autocomplete(data);
</script>
Variable “data” hold the terms that you would like the user to see in the search suggestion list and $(“#myInputBox”) is the id of the search input box.
Let’s check out how we can automatically call WordPress tags in our search suggestions, using WordPress wpdb class:
<?php
    global $wpdb;
    $search_tags = $wpdb->get_results('SELECT name FROM $wpdb->terms');
    foreach ($search_tags as $mytag){
        echo $mytag->name. ' ';
    }
?>
Here I am using WordPress wpdb class to fetch all tags assigned to the posts.
Here’s the complete code to enable this feature on your WordPress blog. Just replace the folder name with actual folder and the jQuery selector $(“#myInputBox”) with the actual id of search input box.
<script type=text/javascript src=PATH_TO/jquery.autocomplete.pack.js></script>
<link href="PATH_TO/jquery.autocomplete.css" rel="stylesheet" media="screen" type=text/css />
<!-- This goes in the head -->
<script type=text/javascript>
	$(document).ready(function(){
		var data = '<?php global $wpdb; $search_tags = $wpdb->get_results("SELECT name FROM $wpdb->terms"); foreach ($search_tags as $mytag){ echo $mytag->name. " "; } ?>'.split(" ");
		$("#ID_OF_SEARCH_INPUT_BOX").autocomplete(data);
	});
</script>
Don’t forget to add your inputs in the comments section below.